
Key handovers are the last analog bottleneck of a remote-run rental. With a smart lock connected to Taskbeast you can open the door from anywhere, issue codes that start and expire with each stay, and let your check-in automations deliver access instructions — including the code — only when you decide the guest has earned them (documents submitted, payment done).
Taskbeast works with all the most popular smart-lock and access-control brands — and noise sensors and smart thermostats connect the same way:
 Nuki
Nuki Tedee
Tedee Igloohome
 Ring
Ring August
 Yale
Yale Schlage
 Kwikset
 Ultraloq
 Lockly
 Wyze
Wyze TTLock
 SmartThings
 Salto
Salto Brivo
Brivo Kisi
Kisi Avigilon Alta
 Dormakaba
 Assa Abloy
 Hotek
Hotek 2N
2N KeyNest
 Minut
Minut NoiseAware
 Ecobee
 Google Nest
 Honeywell Resideo
 First Alert
Good to know: The full brand picker appears in the Connect Device window — if your device has a cloud account, chances are it plugs in.
Connect your first lock
- 1Open Devices in the left sidebar and click Connect Device.
- 2Pick your lock’s brand in the window that opens and log in with the credentials of the lock’s own app (your Nuki account, your Igloohome account…).
- 3Grant access. Your locks appear on the Devices page — under Unassigned devices until you tell Taskbeast which apartment each one opens.
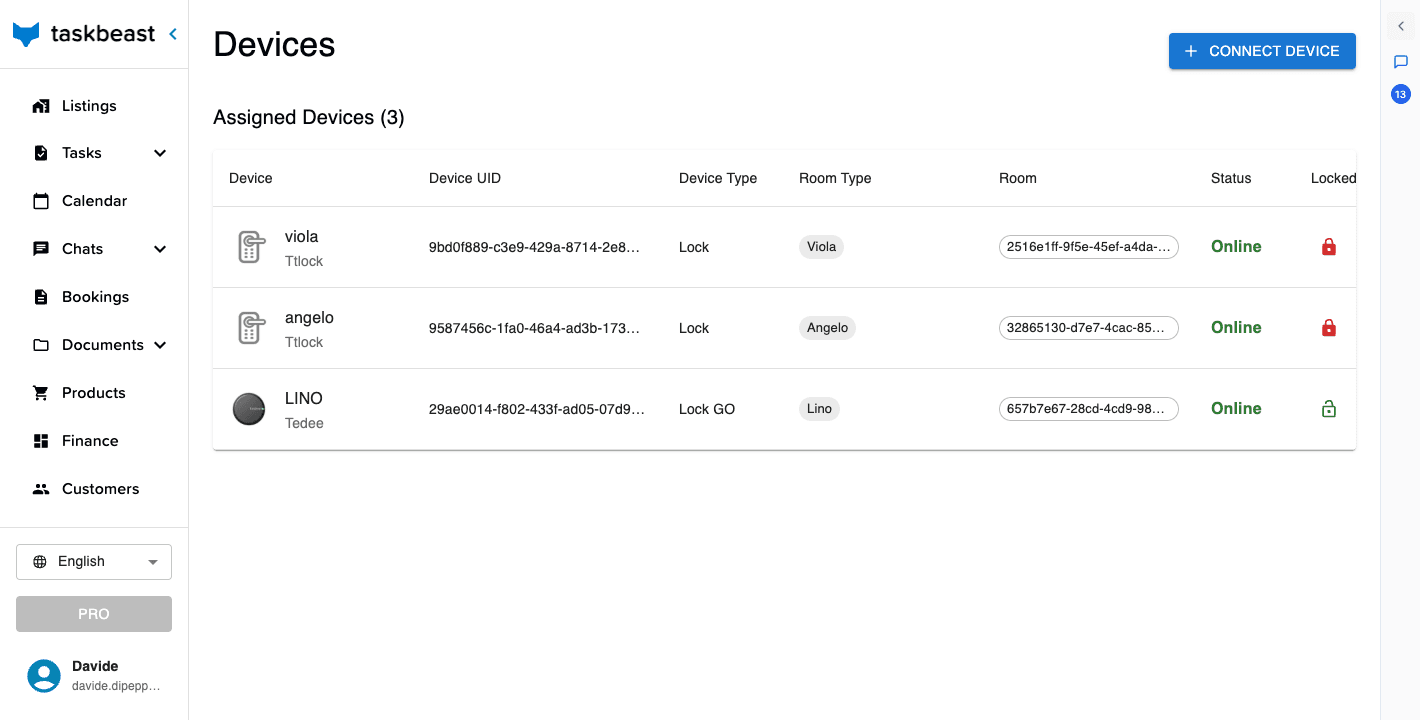
Tell each lock which door it opens
- 1On the Devices page, click Assign to room on an unassigned device and pick the listing and room. The device moves to the Assigned devices table.
- 2No rooms yet? Create them on the listing: Operations tab → Units section → Add room (or Multiple units to create several identical ones at once).
- 3The same Units section shows each room’s devices and access codes — it is the per-listing view of the same hardware.
Operate and monitor from anywhere
- Lock / unlock — the lock icon on the device row operates the door remotely. Red closed padlock = locked, green open padlock = unlocked. Treat it with respect: it moves a real door.
- Status — green online / red offline. An offline lock cannot be operated or receive new codes remotely; check its bridge or Wi-Fi.
- Access codes — the key icon opens the code panel for that device (greyed out on locks that don’t support remote codes).
Issue a code that expires with the stay
- 1Click the key icon on the device (or Manage access codes in the listing’s Units section).
- 2Click Create access code: choose the code, give it a name you’ll recognize (“Miranda — Aug 12–15”), and set the start and end dates.
- 3The code physically works only inside that window — no more changing the master code after every guest.
- 4Edit or delete codes from the same panel at any time.
Let your automations hand out the keys
The finishing move is connecting locks to your guest flow:
- Put the door code and entry steps in your access-instructions template, and send it from a task that fires before check-in (see the automated-tasks tutorial).
- Gate it: a task like “send access instructions only after the guest submits the check-in documents” makes compliance effortless — the assistant tracks who has submitted and releases the code accordingly (see the guest-identities tutorial).
- Door details you taught the assistant — codes, elevator quirks, no-shoes policy — live in its rules (see the Task Learner tutorial), so it answers “how do I get in?” correctly at 2am without waking you.
More tutorials
Collect guest identities automatically
Set up the online check-in form, choose which details and documents guests must provide, and let automated messages do the chasing.
Invoices and receipts
Configure how your invoices look, keep them updated as you add extra services, and share them with guests in one click.
Your team: access levels and the staff roster
Invite co-hosts and field staff with the right level of access, build the cleaner/manager roster the AI relies on, and understand exactly who can see what.