
Every booking has one personal link. Before arrival it is the guest identification form (see the guest-identities tutorial); the moment the guest submits it, the same link becomes their welcome page: address and stay dates, how to get into the apartment — instructions in their language, photos, door passwords and buttons that open a connected lock or intercom — plus your contacts and the listing’s FAQ. Nothing to send twice, nothing to copy by hand.
This tutorial sets it up end to end: connect the device, write the instructions, describe the doors, share the link, and see exactly what the guest sees before and after submitting.
Connect the device that opens the door
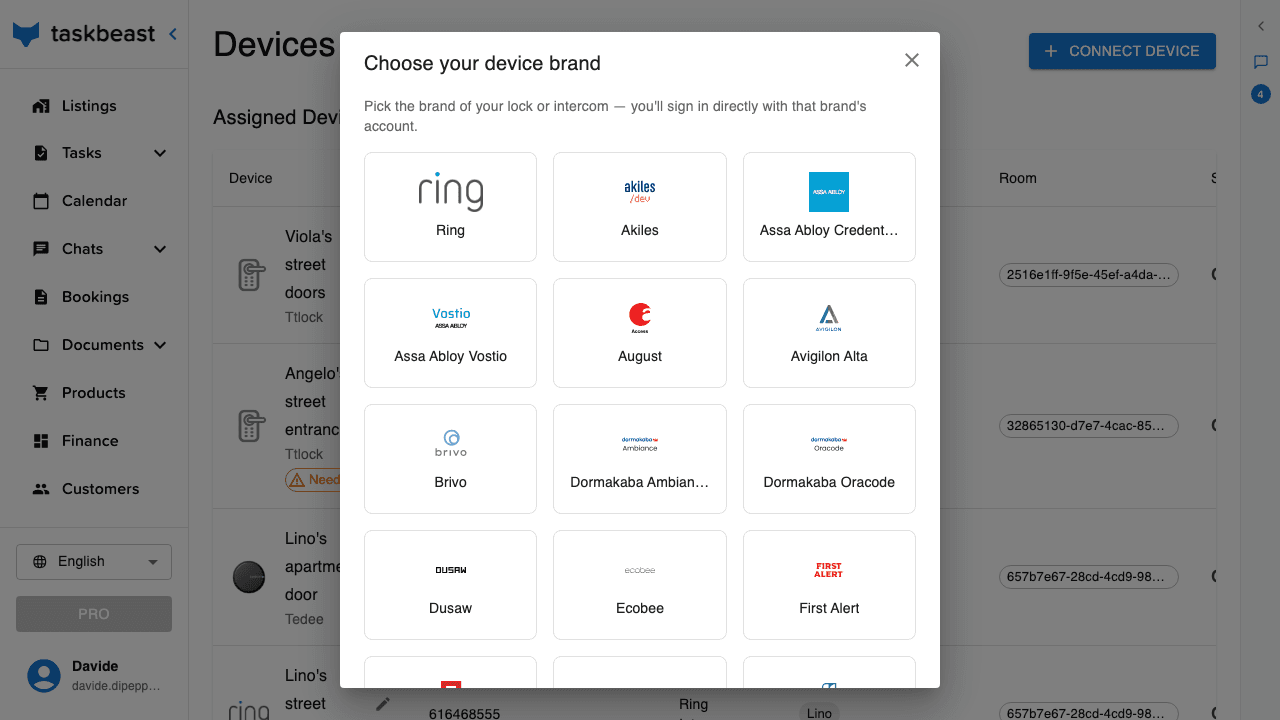
- 1Open Devices in the left sidebar and click Connect Device.
- 2Pick your brand in the grid — locks, intercoms, keypads. You sign in directly with that brand’s account: for most brands a login window opens; for Ring you type your Ring credentials, confirm the two-factor code and tick which devices to import.
- 3The device appears on the Devices page. Click Assign to room and pick the listing (and room) it opens — that is what makes it selectable in the listing’s access settings below.
- 4No smart lock? Skip this step: you can still share a fixed password per door (keybox, keypad, gate code).
Write the access instructions
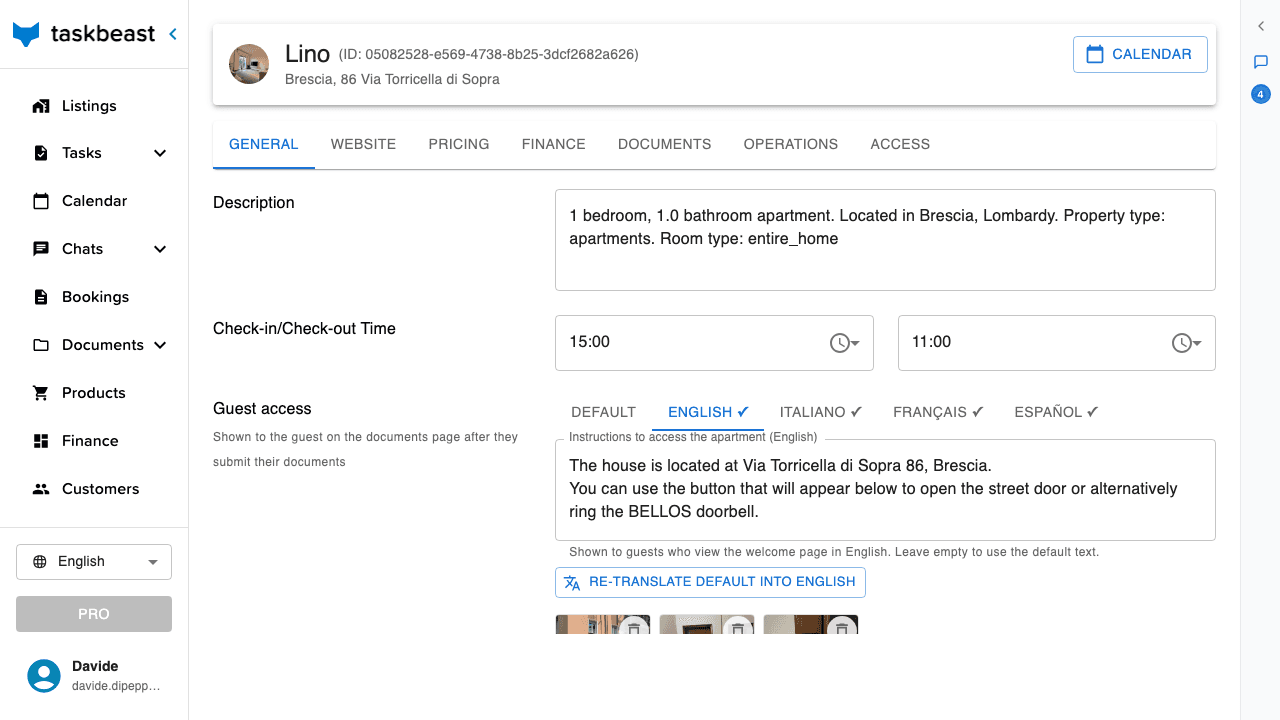
- 1Open the listing from Listings, stay on the General tab and scroll to Guest access.
- 2Write the instructions in the Default tab: how to find the building, which doorbell, which floor, where the keys are, what to do in the first minute inside.
- 3Add a version per language with the English / Italiano / Français / Español tabs — the guest sees the version matching the language they pick on the welcome page, and the default text otherwise. Translate default into… drafts that language from the default text; read it before saving.
- 4Click Add photo to attach up to six pictures shown under the instructions: the entrance from the street, the keypad, the keybox.
Describe the doors
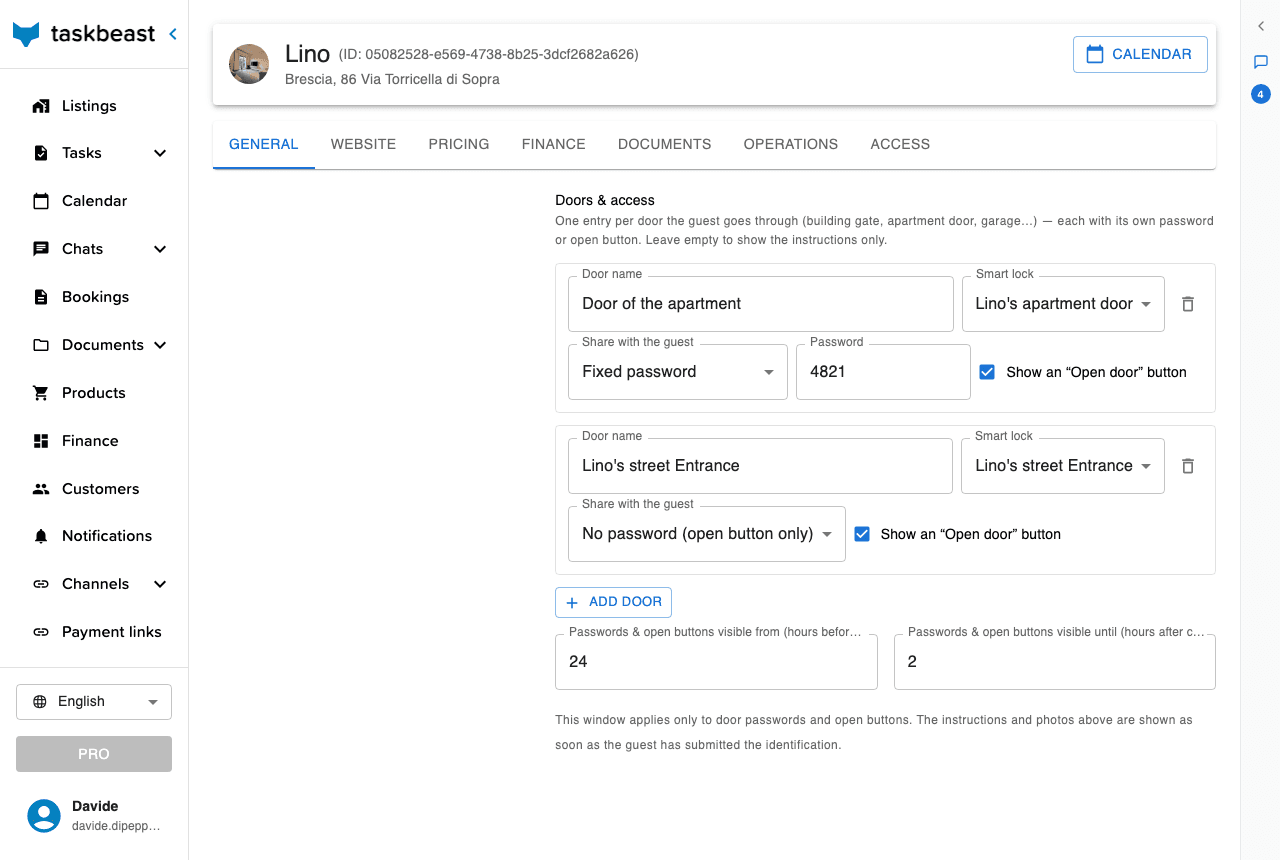
Under Doors & access, add one entry for every door the guest goes through — building gate, apartment door, garage. Each door decides on its own what the guest gets:
- Door name — what the guest reads next to the password or button (“Building gate”, “Apartment door”).
- Smart lock — the connected device that opens this door, or No smart lock for a purely manual door.
- Share with the guest — Fixed password (a code you type once: keybox, gate, keypad), Existing lock password (one of the codes already on the lock), New password for every stay (Taskbeast creates a code on the lock valid only for that stay) or No password (open button only).
- Show an “Open door” button — the guest opens the door from the page with their phone, through the connected lock or intercom. The option is disabled, with the reason, when the device can’t be opened remotely.
- 1Set Passwords & open buttons visible from / until: how many hours before check-in the codes and buttons appear, and how many hours after check-out they disappear. Instructions and photos are not affected — they show as soon as the identification is submitted.
- 2In Welcome page contacts, choose which manager numbers the guest can call and which number the WhatsApp button opens (your Taskbeast number by default, so the assistant handles the chat).
- 3Click Save. The questions shown at the bottom of the welcome page come from the FAQ section of the same tab.
Share the link with the guest
The welcome page lives at the same link as the identification form, so it is already in your check-in messages — the guest-identities tutorial covers the template variable and the automated send. From the booking you also control it by hand:
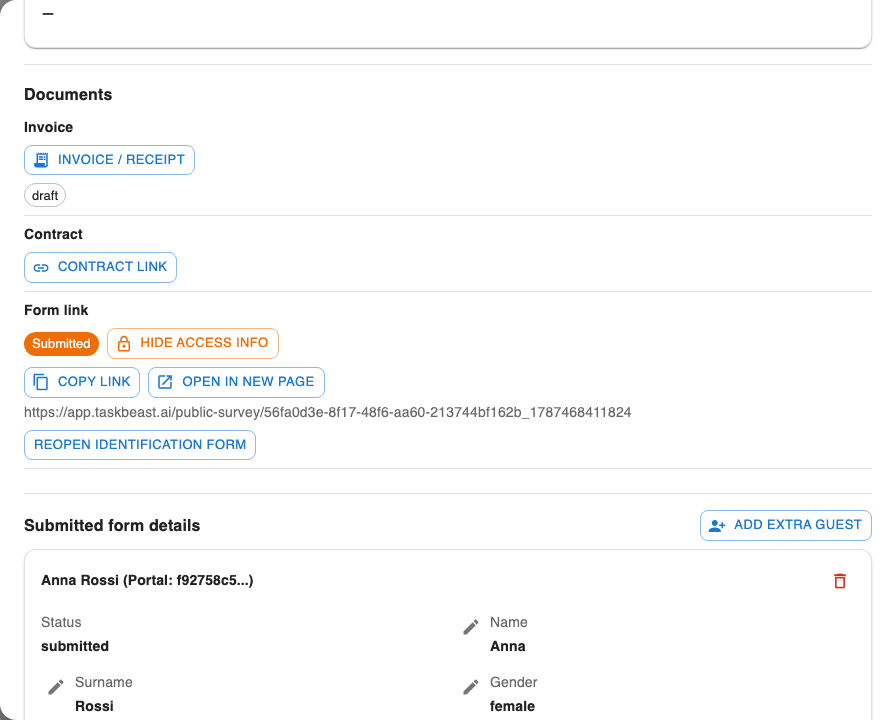
- Copy link / Open in new page — in the booking’s Form link block, to resend the link or preview the page exactly as the guest sees it.
- Hide access info — removes the “How to access the apartment” section from this guest’s page only (unpaid balance, a stay you are handling in person…). Show access info puts it back.
- Reopen identification form — lets the guest correct and resubmit their details on the same link.
Good to know: The link is per booking and never expires. If you enabled the form password in the listing’s Documents tab, it protects the whole page — welcome tab included.
What the guest sees before submitting
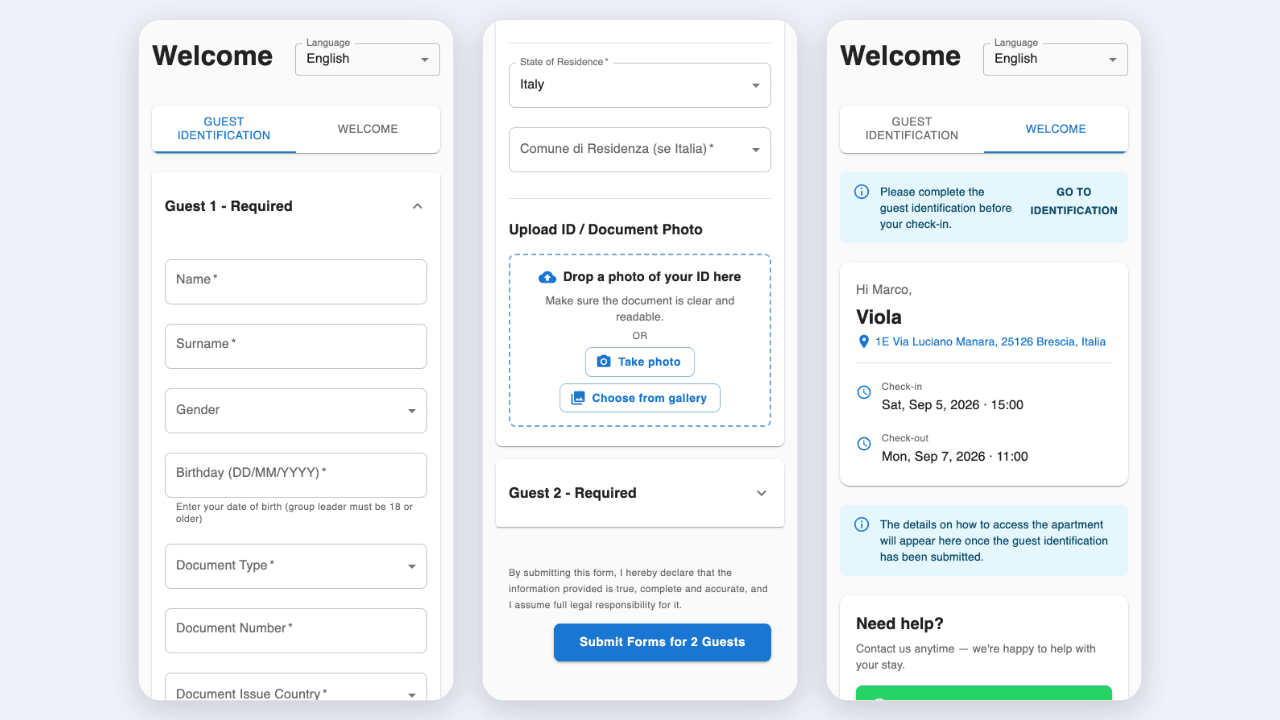
The page opens with two tabs. Guest identification is the form — one card per guest, the fields you chose, the ID photo upload, one submit button for the whole group. Welcome already shows the stay: address with a map link, check-in and check-out times, your contacts and the FAQ; where the access details will be, a notice explains they appear once the identification has been submitted.
What the guest sees after submitting
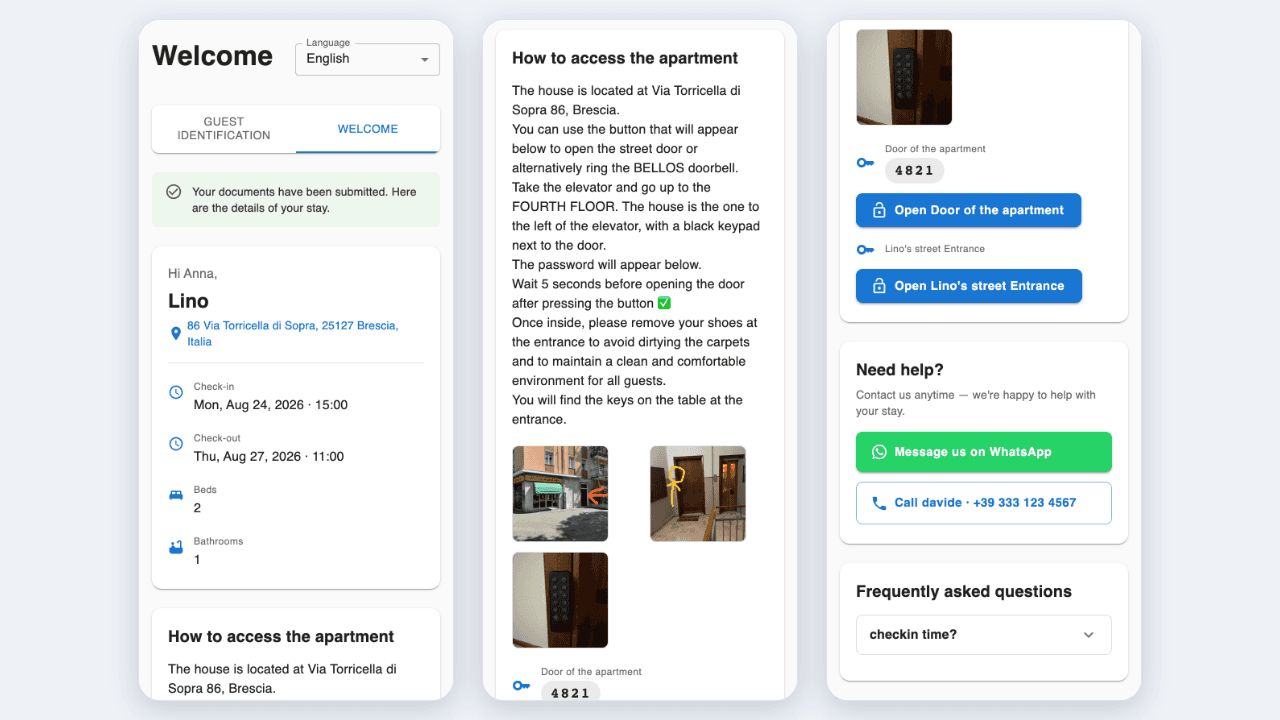
As soon as the forms are in, the link opens on the Welcome tab: How to access the apartment with the instructions in the guest’s language and your photos, then one row per door — the password in large digits and the Open button that unlocks the real door. Codes and buttons follow the visibility window you set; the identification tab stays available for corrections. Below, Need help? offers the WhatsApp button and your manager numbers, and the FAQ answers the usual questions before they reach your inbox.
More tutorials
Collect guest identities automatically
Set up the online check-in form, choose which details and documents guests must provide, and let automated messages do the chasing.
Invoices and receipts
Configure how your invoices look, keep them updated as you add extra services, and share them with guests in one click.
Your team: access levels and the staff roster
Invite co-hosts and field staff with the right level of access, build the cleaner/manager roster the AI relies on, and understand exactly who can see what.